The prerequisites are
1. A windows 2003 server with IIS installed(which will act as the silverlight application server)
2. SQL server 2008 installed on the same machine (which will act as the database server). You can choose to have it on another machine, if your database is huge and you need better performance
3. Team foundation server which has the source code of the application to be deployed (This is not mandatory, you can deploy the application from the development machine directly if you do not use TFS for storing source code)
In principle, the following needs to be done when deploying a silverlight application from TFS.
1. Install prerequisites for deploying through TFS
2. Deploy the silverlight application
3. Configuring IIS
4. Database configuration
The above are covered in detail in my upcoming posts.
Saturday, May 14, 2011


Thursday, April 28, 2011
Silverlight application deployment - Part 3
From the previous posts,these are the steps
1. Install prerequisites for deploying through TFS
2. Deploy the silverlight application
3. Configuring IIS
4. Database configuration
We'll cover
2. Deploy the silverlight application
a. Create Virtual Directory in IIS
b. Creating build definition in TFS for automated deployment
c. Trigger build deployment
a. Create virtual directory in IIS
1. Start->Run--> Type Inetmgr
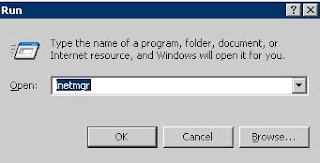
2. Right click on default website-->New--> Virtual Directory

3. The Virtual Directory wizard opens. Click ‘Next’

4. Enter the name of the virtual directory. - Project1. Notice that this should correspond to the Virtual directory path you mention above in the build arguments. ie. Default Web Site\Project1

5. Click “Next” and enter the path of the content directory. This is the folder where the actual files will be stored.
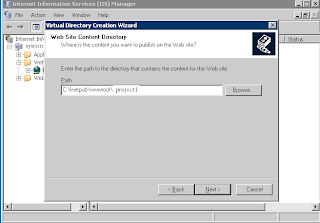
6. Click “Next” and give "Read" and "Run Scripts" permissions. Click Next to finish.

b. Creating build definition in TFS for automated deployment
Before triggering deployment, we need to create a build definition in TFS which contains the application path and other required parameters which will be used to do deployment. Some of the parameters are, the path in IIS where the application should be deployed. The login credentials of the remote machine and so on.
Steps:
Open Visual Studio

Connect to Team Foundation Server --> to the project
Click on New build definition

Enter any name for the build definition

Select the trigger options. (information regarding, When you want the build to be deployed)

Select the build controller. This should be installed when setting up TFS. Also specify the location where the build should be copied to.

Enter the path of the solution file

In the advanced tab, Enter the MSbuildArguments
The mandatory arguments are follows
/p:DeployOnBuild=True /p:DeployTarget=MsDeployPublish /p:MsDeployPublishMethod=RemoteAgent /p:MsDeployServiceUrl=http://10.13.13.11 /p:DeployIISAppPath="Default Web Site/Project1" /p:username=webdeploy /p:password=pass38930!
p:MsDeployServiceUrl denotes the remote machine ip
p:username and password are the login for webdeploy account
p:DeployIISAppPath is the path in IIS where you want the Virtual Directory to be created.

Save the build definition.
c. Trigger build deployment
Right click on builds --> queue new build and select the build definition you created

1. Install prerequisites for deploying through TFS
2. Deploy the silverlight application
3. Configuring IIS
4. Database configuration
We'll cover
2. Deploy the silverlight application
a. Create Virtual Directory in IIS
b. Creating build definition in TFS for automated deployment
c. Trigger build deployment
a. Create virtual directory in IIS
1. Start->Run--> Type Inetmgr

2. Right click on default website-->New--> Virtual Directory

3. The Virtual Directory wizard opens. Click ‘Next’

4. Enter the name of the virtual directory. - Project1. Notice that this should correspond to the Virtual directory path you mention above in the build arguments. ie. Default Web Site\Project1

5. Click “Next” and enter the path of the content directory. This is the folder where the actual files will be stored.
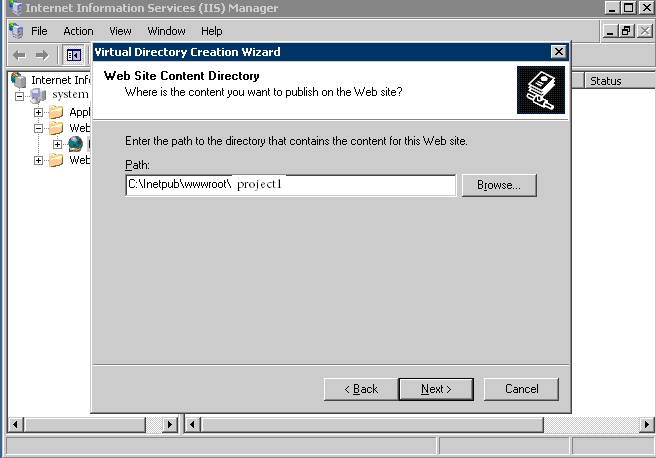
6. Click “Next” and give "Read" and "Run Scripts" permissions. Click Next to finish.

b. Creating build definition in TFS for automated deployment
Before triggering deployment, we need to create a build definition in TFS which contains the application path and other required parameters which will be used to do deployment. Some of the parameters are, the path in IIS where the application should be deployed. The login credentials of the remote machine and so on.
Steps:
Open Visual Studio

Connect to Team Foundation Server --> to the project
Click on New build definition

Enter any name for the build definition

Select the trigger options. (information regarding, When you want the build to be deployed)

Select the build controller. This should be installed when setting up TFS. Also specify the location where the build should be copied to.

Enter the path of the solution file

In the advanced tab, Enter the MSbuildArguments
The mandatory arguments are follows
/p:DeployOnBuild=True /p:DeployTarget=MsDeployPublish /p:MsDeployPublishMethod=RemoteAgent /p:MsDeployServiceUrl=http://10.13.13.11 /p:DeployIISAppPath="Default Web Site/Project1" /p:username=webdeploy /p:password=pass38930!
p:MsDeployServiceUrl denotes the remote machine ip
p:username and password are the login for webdeploy account
p:DeployIISAppPath is the path in IIS where you want the Virtual Directory to be created.

Save the build definition.
c. Trigger build deployment
Right click on builds --> queue new build and select the build definition you created

Wednesday, April 27, 2011
Silverlight application deployment - Part 2
From the previous post, these are the major steps.
1. Install prerequisites for deploying through TFS
2. Deploy the silverlight application
3. Configuring IIS
4. Database configuration
In this post, We'll cover
1. Install prerequisites for deploying through TFS
Silverlight deployment to a remote machine can be done in many ways. In this guide, we assume that the code is available in Team foundation server, and you want to deploy it to a remote machine.
(Note: If you do not use Team foundation server, you can open your silverlight project and directly publish it to the remote machine.)
In order to deploy the code from the Team foundation server, to the remote machine, An IIS extension called "Web deployment tool" should be installed on the remote machine(where you want to install the app). When you install this, the Remote Agent Service also should be installed. Ensure that you select it, while installing. The Remote Agent service communicates with Team Foundation Server and deploys the application.
a. Create Webdeploy account
b. Install Remote Agent Service
c. Start Remote Agent Service
a. Create Webdeploy account
Go to control panel-->Administrative Tools --> Computer Management
Right Click to Create a User

Add the user to the list of remote desktop users.

This user account is to be used when creating the build definition and giving the credentials for automated deployment.
b. Install Remote Agent Service
If you already have installed IIS on the remote machine, check the control panel to see if Web deployment tool is available. If it is available, Click Change/Repair and install the Remote Agent Service.
If not Download Webdeploy and install it.


c. Start Remote Agent Service
To start the Web Deployment Agent Service, click Start --> Control Panel, Administrative Tools--> Services.
Find Web Deployment Agent Service. If it is not started, right-click it and select ‘Start’. You can also set the startup type ‘Automatic’

..continued on Part 3
1. Install prerequisites for deploying through TFS
2. Deploy the silverlight application
3. Configuring IIS
4. Database configuration
In this post, We'll cover
1. Install prerequisites for deploying through TFS
Silverlight deployment to a remote machine can be done in many ways. In this guide, we assume that the code is available in Team foundation server, and you want to deploy it to a remote machine.
(Note: If you do not use Team foundation server, you can open your silverlight project and directly publish it to the remote machine.)
In order to deploy the code from the Team foundation server, to the remote machine, An IIS extension called "Web deployment tool" should be installed on the remote machine(where you want to install the app). When you install this, the Remote Agent Service also should be installed. Ensure that you select it, while installing. The Remote Agent service communicates with Team Foundation Server and deploys the application.
a. Create Webdeploy account
b. Install Remote Agent Service
c. Start Remote Agent Service
a. Create Webdeploy account
Go to control panel-->Administrative Tools --> Computer Management
Right Click to Create a User

Add the user to the list of remote desktop users.

This user account is to be used when creating the build definition and giving the credentials for automated deployment.
b. Install Remote Agent Service
If you already have installed IIS on the remote machine, check the control panel to see if Web deployment tool is available. If it is available, Click Change/Repair and install the Remote Agent Service.
If not Download Webdeploy and install it.


c. Start Remote Agent Service
To start the Web Deployment Agent Service, click Start --> Control Panel, Administrative Tools--> Services.
Find Web Deployment Agent Service. If it is not started, right-click it and select ‘Start’. You can also set the startup type ‘Automatic’

..continued on Part 3
Monday, April 25, 2011
PMP - learning for the exam
I suggest doing an online course which will help you get the required PM education hours. It will give you an idea of the course material before applying for PMP. There are many sellers online, with a lot of claims. Select the one that suits you. I did the course online with pmtrainingonline
It was good..narration and pictures with tests and excercises and learning aids..289 USD for the online course.. - 56 hours of learning + a practise exam.
The book HeadFirst PMP is a great book for PMP..it keeps you awake and interested. - my favourite. They also have a full lesson and a full 200 question exam (with answers) for anyone to download!!
You can also read through Rita's PMP prep guide. Its a widely used book. The process chart is quite useful and its good to memorise it for the exam.
The inputs tools and techniques of each process is a must-know item. You dont have to memorise all of them. If you can..definitely go ahead..If not..try to remember what you can.
Apart from that you need to be familiar with formulae and definitions of terms which could appear on the exam. This is a good one.
Take some 4-5 free practise tests online...and review the answers.
http://www.pmstudy.com/PMP-Exam-Resources/freeSimulatedTest.asp
http://www.examcentral.net/pmp/members
free flash cards
It was good..narration and pictures with tests and excercises and learning aids..289 USD for the online course.. - 56 hours of learning + a practise exam.
The book HeadFirst PMP is a great book for PMP..it keeps you awake and interested. - my favourite. They also have a full lesson and a full 200 question exam (with answers) for anyone to download!!
You can also read through Rita's PMP prep guide. Its a widely used book. The process chart is quite useful and its good to memorise it for the exam.
The inputs tools and techniques of each process is a must-know item. You dont have to memorise all of them. If you can..definitely go ahead..If not..try to remember what you can.
Apart from that you need to be familiar with formulae and definitions of terms which could appear on the exam. This is a good one.
Take some 4-5 free practise tests online...and review the answers.
http://www.pmstudy.com/PMP-Exam-Resources/freeSimulatedTest.asp
http://www.examcentral.net/pmp/members
free flash cards
PMP first steps
Me: I want to become PMP certified!!
PMPbug: Oh I see..that's great..ok..go ahead!
Me: Where do I start?
PMPbug: Of course, at the PMI website, There is a pdf file which goes through the entire process...
Me: Can I have something simple...like a flowchart or an algorithm..
PMPbug: Here's the flowchart..but first register and create an account in the PMI site..

PMPbug: Oh I see..that's great..ok..go ahead!
Me: Where do I start?
PMPbug: Of course, at the PMI website, There is a pdf file which goes through the entire process...
Me: Can I have something simple...like a flowchart or an algorithm..
PMPbug: Here's the flowchart..but first register and create an account in the PMI site..

Monday, January 31, 2011
Team Foundation Server 2010 web access
You can access projects in Team Foundation server 2010 using web access.
There is no need for any client component to be installed in order to use web access.
URL: http://servername:8080/tfs/web/

There is no need for any client component to be installed in order to use web access.
URL: http://servername:8080/tfs/web/

Friday, January 28, 2011
"Microsoft.TestCaseCategory" not found while connecting to TFS
In order to work on VS2010 Test Professional, you need to have a TFS server configured and running. When we connect from VS 2010 Test Professional to a project in TFS 2010, there is no issue as all the categories are in sync. However, If you have installed VS 2010 Test Professional and you try to connect to a TFS 2010 server which is upgraded from TFS 2008, you will see the error below
NOTE: All variables that depend on your system are specified in red color and all constant values that you should enter specified in blue color.

You need to update certain values before you can connect to the project. And to do this you need VS 2010 Professional or any other edition in order to get the latest category files.
Step1: Install Visual Studio 2010 Trial if you do not have Visual Studio 2010
Step2: Connect to your TFS server from Visual Studio 2010 (since you cannot connect from VS Test Professional)

Step 3: Right Click on the default project collection node (not the project node!) and select Team Project Collection Settings --> Process Template Manager

Step 4: Select the process template your organisation is following (Cmmi or Agile). The "MSF for Agile Software Development V 5.0" is the default. Select the latest version 5.0 to get all the work items available. Version 4.0 has some workitems missing.

Step 5: Click 'Download' and specify location to save it. (The following commands are under the assumption that you have saved it in C:\) You willl see the following message.

Under C:\, you will see the folder MSF for Agile Software Development v5.0
For convience, copy over the below files to C:\ (Makes it easier when running commands)
a) All the files in C:\MSF for Agile Software Development v5.0\WorkItem Tracking\TypeDefinitions
b) The categories.xml file in C:\MSF for Agile Software Development v5.0\WorkItem Tracking
Step 6:
Open the TestCase.xml file
Find the following and replace them correspondingly and save the file.
Original Value Expected Value
External Link Count ExternalLinkCount
Related Link Count RelatedLinkCount
Hyperlink Count HyperlinkCount
Attached File Count AttachedFileCount
Area ID AreaID
Open the SharedStep.xml file . Find the following and replace them correspondingly and save the file.
Original Value Expected Value
External Link Count ExternalLinkCount
Related Link Count RelatedLinkCount
Hyperlink Count HyperlinkCount
Attached File Count AttachedFileCount
Area ID AreaID
Iteration ID IterationID
Step 7: Open command prompt and change directory to the Visual Studio installation folder in your machine - C:\Program Files\Microsoft Visual Studio 10.0\Common7\IDE

Step 8: Import Work Item definitions
C:\Program Files\Microsoft Visual Studio 10.0\Common7\IDE> witadmin importwitd /collection:http://servername:8080/tfs/CollectionName /p:projectname /f:"C:\UserStory.xml"
C:\Program Files\Microsoft Visual Studio 10.0\Common7\IDE> witadmin importwitd /collection:http://servername:8080/tfs/CollectionName /p:projectname /f:"C:\TestCase.xml"
C:\Program Files\Microsoft Visual Studio 10.0\Common7\IDE> witadmin importwitd /collection:http://servername:8080/tfs/CollectionName /p:projectname
/f:"C:\SharedStep.xml"
Step 9: Import Categories
C:\Program Files\Microsoft Visual Studio 10.0\Common7\IDE> witadmin importcategor
ies /collection:http://servername:8080/tfs/CollectionName /p:ProjectName /f:"C:\categories.xml"
Step 10: Disconnect from VS 2010 --> TFS, if you are connected. Reconnect. You should now see all the work items

Once this is done, you will be able to connect from VS Test Professional 2010 to the TFS project.
NOTE: All variables that depend on your system are specified in red color and all constant values that you should enter specified in blue color.
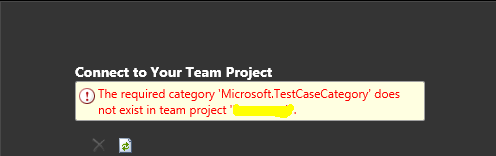
You need to update certain values before you can connect to the project. And to do this you need VS 2010 Professional or any other edition in order to get the latest category files.
Step1: Install Visual Studio 2010 Trial if you do not have Visual Studio 2010
Step2: Connect to your TFS server from Visual Studio 2010 (since you cannot connect from VS Test Professional)

Step 3: Right Click on the default project collection node (not the project node!) and select Team Project Collection Settings --> Process Template Manager

Step 4: Select the process template your organisation is following (Cmmi or Agile). The "MSF for Agile Software Development V 5.0" is the default. Select the latest version 5.0 to get all the work items available. Version 4.0 has some workitems missing.

Step 5: Click 'Download' and specify location to save it. (The following commands are under the assumption that you have saved it in C:\) You willl see the following message.
Under C:\, you will see the folder MSF for Agile Software Development v5.0
For convience, copy over the below files to C:\ (Makes it easier when running commands)
a) All the files in C:\MSF for Agile Software Development v5.0\WorkItem Tracking\TypeDefinitions
b) The categories.xml file in C:\MSF for Agile Software Development v5.0\WorkItem Tracking
Step 6:
Open the TestCase.xml file
Find the following and replace them correspondingly and save the file.
Original Value Expected Value
External Link Count ExternalLinkCount
Related Link Count RelatedLinkCount
Hyperlink Count HyperlinkCount
Attached File Count AttachedFileCount
Area ID AreaID
Open the SharedStep.xml file . Find the following and replace them correspondingly and save the file.
Original Value Expected Value
External Link Count ExternalLinkCount
Related Link Count RelatedLinkCount
Hyperlink Count HyperlinkCount
Attached File Count AttachedFileCount
Area ID AreaID
Iteration ID IterationID
Step 7: Open command prompt and change directory to the Visual Studio installation folder in your machine - C:\Program Files\Microsoft Visual Studio 10.0\Common7\IDE

Step 8: Import Work Item definitions
C:\Program Files\Microsoft Visual Studio 10.0\Common7\IDE> witadmin importwitd /collection:http://servername:8080/tfs/CollectionName /p:projectname /f:"C:\UserStory.xml"
C:\Program Files\Microsoft Visual Studio 10.0\Common7\IDE> witadmin importwitd /collection:http://servername:8080/tfs/CollectionName /p:projectname /f:"C:\TestCase.xml"
C:\Program Files\Microsoft Visual Studio 10.0\Common7\IDE> witadmin importwitd /collection:http://servername:8080/tfs/CollectionName /p:projectname
/f:"C:\SharedStep.xml"
Step 9: Import Categories
C:\Program Files\Microsoft Visual Studio 10.0\Common7\IDE> witadmin importcategor
ies /collection:http://servername:8080/tfs/CollectionName /p:ProjectName /f:"C:\categories.xml"
Step 10: Disconnect from VS 2010 --> TFS, if you are connected. Reconnect. You should now see all the work items
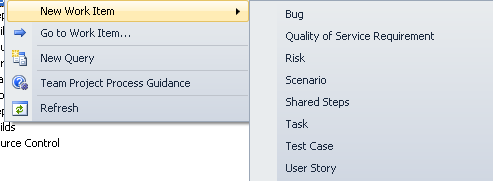
Once this is done, you will be able to connect from VS Test Professional 2010 to the TFS project.
Subscribe to:
Posts (Atom)